Home > PowerPoint Tutorials > Smart Art > Radial Diagram
Discover an easy way to draw a PowerPoint Radial in 3D with SmartArt. Follow our simple step by step instruction to draw this useful diagram.
This tutorial has been updated with a step by step video on creating the Radial Diagram in latest versions of PowerPoint.
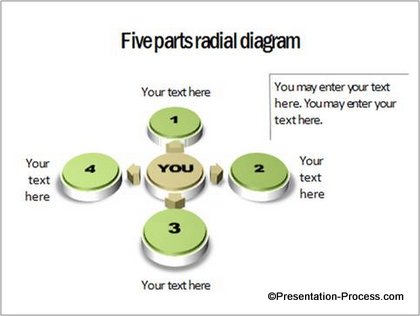
The Radial Diagram you’ll learn to create today is:

Radial Diagram in PowerPoint
The diagram is as useful as it is elegant.
Where to use the Diagram in your PowerPoint presentations?
The diagram is useful to depict ‘Hub and Spoke’ relationship. For example, in the template shown above, we showed you how the core idea in the centre is connected to four other ideas surrounding it. You can create your own variations of the diagram depending on your need.
Let us jump right in and create the diagram step by step:
Step 1: Create base structure with Smart Art tool
Go to Insert -> SmartArt -> Cycle -> Diverging Radial. You will get this template as a result:
 However, it is not possible to create the kind of diagram we need within SmartArt. So we need to break it up.
Click on any of the circles. Use Ctrl +A to select all the elements in the diagram, Press Ctrl +X. Delete the bounding box. Press Ctrl +V. This pastes the diagram back on the slide. Select all the elements again and group them using Ctrl +G.

Step 2: Create the 3D perspective
To get the proper perspective effect, Right click on the group. Go to Format Shape ->3D rotation -> Perspective -> Perspective relaxed.

Your diagram should look like this:
 Now to build in a realistic 3D look, choose 3D Format -> Top -> Bevel -> Cross bevel.
 Your radial chart should look like this now:
 Giving this diagram the right lighting and material will complete the professional look. To do this, in 3D format choose Depth -> Color -> 20 Pt. Go to Material -> Special Effect -> Dark Edge. Go to Lighting -> Neutral -> Balance.
 With the effect of right lighting and material, your diagram should be like this:
 The diagram looks like its hanging in the air. To adjust the shadow settings for this, in Format shape choose Shadow -> Presets -> Offset center. Change the size of the Shadow to 105% and increase the Blur to 15Pt.
 Your diagram is almost ready:
 Related: Professional shadow effects in PowerPoint
Make changes in Fill color of the discs and arrows. Add call outs and titles where necessary. Add suitable text on the discs if needed. This will complete the diagram template:
Step by Step Video on creating Radial Diagram in PowerPoint
Variations of the 3D Radial Diagram:
There are a number of variations in Radial diagrams to capture various types of relationships. Let us explore a few interesting variations of the diagram. The following diagram templates are from our ‘750+ PowerPoint Charts & Diagrams Pack for CEOs’.

Source: PowerPoint 3D Shapes | CEO Pack 1


Source: 3D Arrows from PowerPoint Charts CEO Pack 1
As you can see, there is no ‘one fixed way’ to create this diagram. You can develop your own variations depending on the type of relationship you want to convey.
By the way, all the 750+ diagram templates in the pack are fully editable. The pack helps busy presenters like you to create professional looking slides in minutes, without having to create diagrams from the scratch.
You just need to copy our diagrams to your slides and your presentations get ready in minutes. Know more about PowerPoint Charts & Diagrams CEO Pack
However, if you have the time to learn the tutorials to create PowerPoint diagrams, our site has enough resources to help you out.
Related: PowerPoint Wheel Diagram Tutorial
Return to Top of 3D Radial Diagram Page

