Home >All Tutorials> PowerPoint Animation> Motion Path Animations in PowerPoint
Learn to add multiple motion path animations and reveal your numbered lists in stages to make your business presentations remarkable.
Example of adding multiple motion path animations in PowerPoint:

We achieved the effect by adding multiple ‘Down’ animation paths to the oval shape.
You can use the effect to present any numbered list in incremental steps. The effect is especially useful to present agenda slide – where you want to move from one point to another on click. Let us see how to set up the slide from scratch.
Step 1: Set up the base slide
Create a slide with ovals and text as shown below:

- Apply quick style to the ovals. Enter the numbers using separate text boxes. Let the font color of numbers be the same as the slide background. In our case, we chose to have the numbers colored in white.
- Group each text box and the line below the text
- Click on the red oval behind number 1 (We will call this as ‘Oval 1’ from here on) and add ‘Descend’ entrance animation.
- Select each of the ‘Text + Line’ groups and apply ‘Wipe’ custom animation. Let the direction of the wipe be ‘From Left’
Now, with the basic set up out of the way, it is time to move to the tricky part of adding multiple ‘Down’ animations to Oval 1.
You may like: Dramatic SmartArt Graphics Change Shape Option
Step 2: Apply ‘Down’ animation
Select all three oval shapes and add Motion path -> Down.

You may ask, “Why did we apply motion path to all 3 ovals, when we want just Oval 1 to move down in steps?”
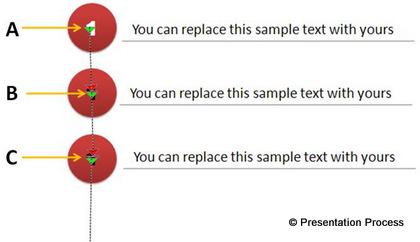
The reason is: Applying a motion path to an object makes it easy for us to know the starting point of animation for that object. Let us call the starting points of the ovals as A, B and C.

Move the end point of the first motion path to touch Point B. This means Oval 1 will move from Point A to Point B
Click on Oval 1 again and go to custom animation pane. Go to ‘Add effect’ and apply ‘Down’ motion path. This motion path again starts from Point A. But, this time we want the motion path to start from point B. So move the starting point of the animation to start from Point B. Let the end point touch Point C.
This is how the final effect would be:

So, Oval 1 has two motion path animations applied to them. One starts from A and ends in B. Another starts from B and ends in C.
If you use motion path animations in PowerPoint you may like to know about a useful free add-in that makes this animation easy.
Step 3: Arrange the animations
The last step is to arrange the sequence of animation properly. First remove all the ovals but for ‘Oval 1’. Here is the final arrangement of animation sequence:

Make sure that you send ‘Oval 1’ to back, so that the numbers appear as soon as the oval comes in place. The final animation is what you saw at the beginning of the article.
Variation of the effect:
There are multiple ways in which you can use PowerPoint effects to create interesting numbered lists.
It takes a lot of time and effort to create professional quality custom animated slides for your business slides. Most business presenters don’t have the time to create such high quality slides for themselves. That is why we came up with our ‘750 Advance Animated Templates for PowerPoint’.
Here is an example of a template than can be used in a fun elearning presentation. Multiple effects are used simultaneously to make this happen.

Here is another way to present your text creatively with animations:

Source: Numbered lists from Animations Pack
About Advanced Animations Pack:
The pack has 750+ graphics, concepts and models that are professionally animated keeping a business presenter in mind. Just choose the template, replace the sample text with your own text and your animated slides get ready in no time.
Since we built our slides entirely using PowerPoint, you can customize every aspect of the templates to suit your need. Browse the animations now to see its utility for yourself…
Browse Animations Pack
Related: Create Ripple text animation effect
